I had a problem at home. I wanted to be able to do maintenance on my recursive DNS server without impacting my home network too significantly. It is exactly the kind of problem that an enterprise network or an ISP might deal with: sometimes you need to do work on a server.
I’ll admit my home network is a bit more complex than most. I’m a network engineer and open source networking software developer, so I built it more like an enterprise or small service provider than a typical home network. I need a place to try new technologies and connect home-built network devices and software stacks for testing. I even have multiple sites, two of which are shown here — my house and some data center space I rent.
Network Design
Here’s a greatly simplified diagram of what this network looks like:
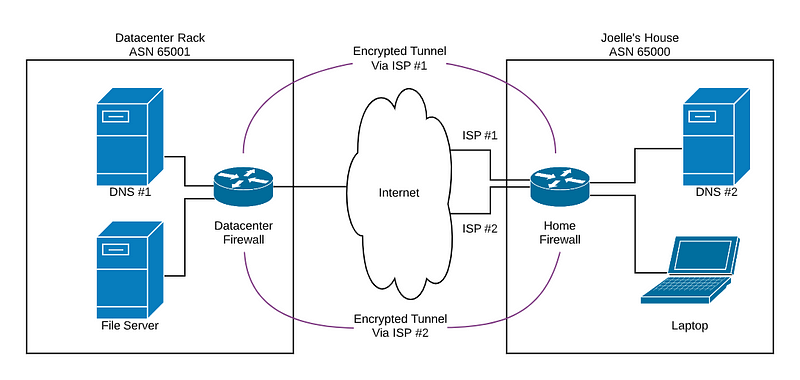
The home network has several network segments, my user (my wife), some additional routing infrastructure not shown, and some servers. One of those servers runs a recursive DNS server. I have two connections to the internet for redundancy, one via DOCSIS and the other via DSL.
The datacenter network is a bit simpler — just one router/firewall, one internet connection (with a lot more redundancy than I would have at home) and some servers. Again, one of those servers is a recursive DNS server.
Connecting these two sites, I use two encrypted VPN tunnels between the firewalls. One VPN tunnel uses the path across the internet using the cable modem at home, the other uses the path that transits the DSL modem. I run BGP across these tunnels, using different autonomous system numbers at each site. Routes sent (either direction) across the DSL (slower) home connection are advertised with a prepend, so that if the cable route is up, the routers on both sides will see those routes advertised with shorter paths.
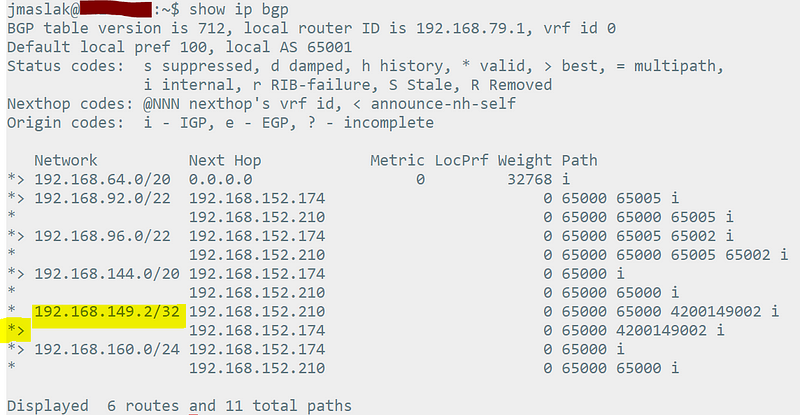
For instance, the routing table (I’ll focus on IPv4, although IPv6 is done in a similar way) on the datacenter firewall/router looks like this:
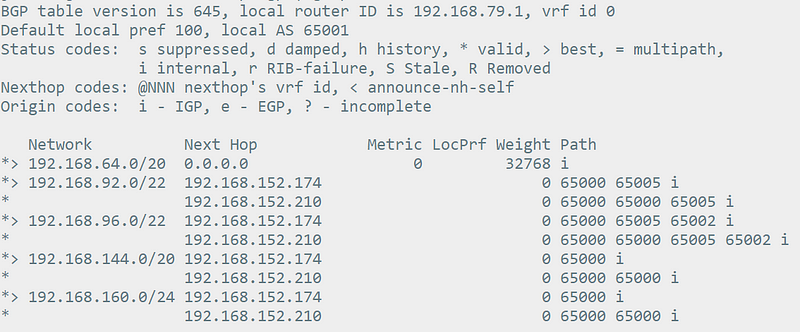
The first prefix is the aggregate I announce from the datacenter. The others are my home or not relevant (A vehicle and my test lab both have unique ASNs and use that to advertise routes towards my house). In particular, 192.168.144.0/20 and 192.168.160.0/24 are used in my home. You can see the two next hops — one cable and one DSL, with the DSL path having 65000 appear twice in the path instead of once (it is prepended).
Each site also has some additional routes used within the site learned via that site’s IGP.
Finally, each site has a default route to the internet (with some work done at my house to allow failover of this default route from cable to DSL when the cable connection goes down). Only internal traffic is routed via the encrypted tunnels. Because of this design, should the datacenter go down completely, my house will still be able to reach the internet. Likewise, if my house should go offline, the datacenter too will be able to reach the internet.
The Problem
Okay, I know that was a lot of information! And, really, this is relevant to environments other than my own. Let’s simplify the problem. Let’s assume we have only one site, but we want to install two DNS servers, so that we can do maintenance on one without impacting users at that site.
Of course DNS has a traditional solution for this: you can configure clients to use multiple DNS servers. Historically that has been problematic — DNS requests would always go to the first configured server, then, after a timeout, the second server would be contacted. The timeout introduced a significant delay, often making applications fail or timeout if the first DNS server failed. While newer operating systems handle this more gracefully, older operating systems continue to use the timeout mechanism to determine if a name server is unresponsive.
One solution is to share a single IP address between two servers, using something like a load balancer (either a dedicated hardware device or software that acts similar to a load balancer). This can be configured in many ways, the simplest would be a strict failover configuration. It might look like this:

This solution works fine, although it is difficult to split these servers across multiple sites. What if you want DNS #1 in one site, and DNS #2 in the other?
My Solution
That’s where we go back to my home network. I have a DNS server in a datacenter and another DNS server at home. As a refresher, my network looks like:
I already have a routing protocol, in this case BGP, running between the two sites. Even though my network does not speak to any ISP via BGP, I use it within my network to distribute routes between sites.
My solution is to take an address within my network’s address space (I use RFC1918 addresses internally) and assign it to the virtual “DNS” function. Since I’m not using 192.168.149.* for anything, I chose 192.168.149.2 for my DNS server’s virtual address. This address will live on the DNS server in each site, and the closest DNS server . This is a pretty well-understood technique in DNS and is typically called “Anycast DNS.”
Each server will advertise, with BGP, to the router it connects to (in my case, router+firewall), this anycast IP. When both DNS servers are up, the datacenter firewall will see the shorter 1-hop BGP route to the datacenter DNS server and use it, while my home will use the shorter (in the home) 1-hop BGP route to the home DNS server.
If one of the servers goes down, let’s say my datacenter server, the datacenter will still see the 2-hop BGP route to the home DNS server, and will switch over to that.
How do we get the address to live on both servers, and get this to be advertised to the firewalls? Let’s walk through this step-by-step.
Step 1 — Installing a DNS Server
Each DNS server needs to be running DNS server software. I’m using Ubuntu for the servers, so I’ve chosen Unbound as my DNS server. There is nothing special with this configuration, it is a standard recursive DNS server at this point. Each server has a “unicast” IP address assigned to it — that is, each server has a unique address. In my case, this is 192.168.65.10 (datacenter) and 192.168.150.53 (home). There are tutorials online to configure this.
We test our unicast DNS server installation by querying it from another machine. For instance, to test the datacenter DNS server, I issue this query:

Step 2 — Adding Anycast Addresses to the Server
Next, I add the anycast address I’ve chosen — 192.168.149.2. The important thing is that this address not be associated with any network configured for any interface on any of my routers. I couldn’t use this address if I used 192.168.149.0/24 for workstations, for instance. Since I don’t, it’s fine. The choice of address here is relatively arbitrary.
So, I need to add 192.168.149.2 to each server. This address will be configured as a “loopback” address. In other words, it’s only reachable via the server itself right now. Client computers won’t be able to connect to 192.168.149.2 yet, even after we add it to the loopback interface.
Since I’m using Ubuntu LTS 18.04, using the server install, it configures network interfaces via CloudInit. I edited the file to look like this — your configuration will likely be somewhat different:

This was done on both machines. I then rebooted the machines to reconfigure them, and, once rebooted, I could see the address added to the “lo” interface:
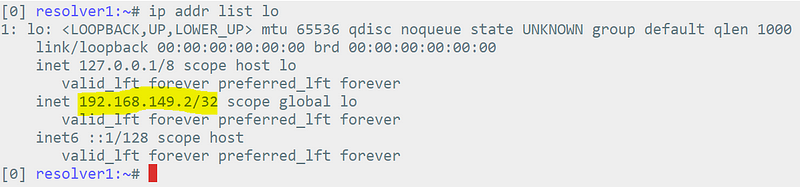
This was done on both machines.
Step 3 — Installing Raku
To announce the routes (so that other computers can contact the DNS servers using the anycast addresses), I’ll be using a Raku package I’ve written, Net::BGP. This requires Raku to be installed. Unfortunately the version included in the standard Ubuntu package repositories is too old to run Net::BGP, so we have to install this from another source, as documented here in the “Debian, Ubuntu, LMDE and Mint” section.
Once done, you should be able to validate that Raku is installed (this is done on each DNS server; I’m doing it on a workstation just to demonstrate below, but you would do this on your DNS servers):

Step 4 — Installing Net::BGP
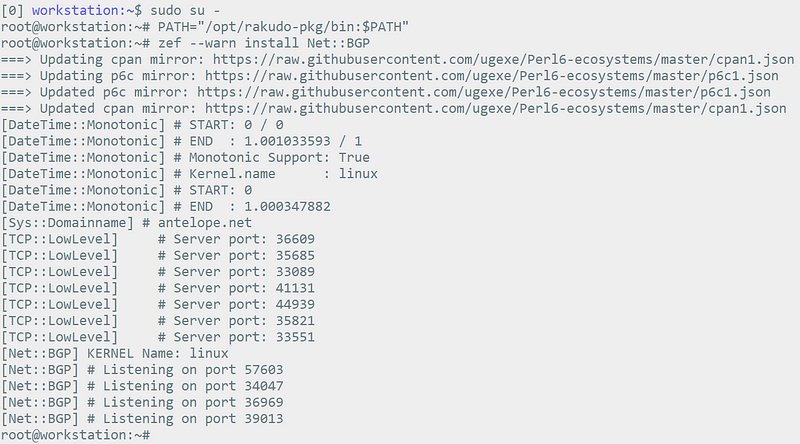
Using the Raku package manager, zef, we install Net::BGP on each DNS server. In a shell session, I set a temporary path to include the Raku binary directory and then execute zef to install the module (“zef –warn install Net::BGP”). The installation can take some time since it is compiling a fairly complex Raku module.
Again, I did the install on a workstation, but you would do this on each DNS server.
Step 5— Configuring your Routers
At this point, I need to select an ASN (autonomous system number) to use for the DNS servers. I chose to use 4200149002, a private 32-bit ASN that encodes “149.2” (the anycast address I’m using) into itself. This is arbitrary — any private ASN should work for my environment, but I wanted to do this via EBGP and not IBGP, so the number needs to differ from the ASN of the router.
Once I have that, each of the routers (firewall+routers in my case) needs to be configured to accept a BGP session from the unicast address of the DNS server connected to it. How BGP works is a bit out of scope for this article, but I’ll give some VyOS configuration (I run a VyOS firewall) snippets for the datacenter firewall’s BGP session to the resolver in the datacenter.

Step 6 — Creating the BGP Script
On each DNS server, we will be creating a shell script that starts up Net::BGP’s bgpmon.p6 utility (despite the name, it will do a bit more than just monitor BGP). bgpmon.p6 can announce routes conditionally based on the results from an external application.
We’ll create this script as /usr/local/bin/start-bgp.sh and make this file executable. In it, we’ll set the paths appropriately and pass some parameters to bgpmon.p6. In particular, we set the ASN to 4200149002, the BGP router ID to the server’s unicast address (in the example we’ll use 192.168.65.10), but it would be each server’s unicast IP), setting the origin to IGP (this isn’t strictly necessary for this example), and configuring the route to announce. We’ll also configure the address of the router it is behind (192.168.65.1 for the datacenter server) and the peer’s ASN (65001 for the datacenter server).
In addition, we need to configure the command (executed every second) to check to make sure the DNS server seems to be up (if for some reason unbound stops properly responding, we want to withdraw the route to it, so that the other server takes over).
So, let’s figure that command out. I used “dig” (a DNS lookup tool) that returns a true value (0) if the lookup succeeds, and false if it doesn’t. In addition, I instructed dig to not perform retries. I’m looking up the magic “version.server” name (in the CH class):

I verify this command returns successfully when run on both servers. The command can be anything that returns an exit status of zero when successful, anything else for failure.
With that sorted, I can now build my script to start bgpmon.p6 (this is the one on the datacenter DNS server, in /usr/local/bin/start-dns.sh):

The options passed to bgpmon.p6 start with “my-asn”, which is the ASN we’re using on each DNS server. We also provide the “my-bgp-id””, providing the DNS server’s unicast address. We give an “origin” option with a value of “i” for IGP (not strictly necessary in this case).
We also give an “announce” option that looks complicated. This simply says to the bgpmon.p6 script, “Announce 192.168.149.2/32 (just a single address) to the router, and tell the router the next hop is 192.168.65.10 (our unicast address).
We also provide the check-command and tell bgpmon.p6 to “suppress-updates” just so that we don’t see any update messages the router sends to us (we don’t process those updates anyhow). We then give the router’s IP and the router’s ASN.
Once I’ve created this and made this script executable, it can be tested as root:

I can also check the routes on seen on the router:

In this case, I am seeing it from the directly-connected 192.168.65.10 router, and also from my home network (192.168.152.174 and 192.168.152.210). My router is using the datacenter route, as I would expect.
I can also ping 192.168.149.2 from various hosts on my network now! As well as do DNS lookups via 192.168.149.2!

If I stop unbound (but leave the start-bgp.sh script running on both DNS servers!) on the datacenter host, what happens? Within a second, I should see the datacenter DNS server route disappear on my datacenter router:
Yep, sure enough! And I should be able to repeat my ping and dig tests and see that traffic is a bit slower to do it’s thing:

Sure enough, my ping time is now 24+ ms, vs. <1ms. And DNS requests still work!
But we’re not done yet. There’s another important step!
Step 7 — Making This Start Automatically
To do this, we need to make this script into a systemd service. On both DNS servers, stop the script (ctrl-C will do it). Make sure to restart unbound if you stopped it.
Then create a file as /etc/systemd/system/bgp.service with contents similar to this:

We are making this start after unbound starts, and we are telling the system we want it running whenever we are in multi-user mode. We also have systemd automatically restart this service should it die.
Then we do the systemd magic to make it auto-start, and we go ahead and start the service:

We can then log into our routers and validate the routing table is as expected — that we see the routes advertised from each of our DNS servers.
Final Step — Start Using!
Now that all this is done, we can configure our clients (or our DHCP servers) to hand out the 192.168.149.2 address to our clients as a DNS server.
Whew! Done!
There’s a lot to this, and maybe, just maybe, it isn’t something most people would want to do at home! But if you do, you now know at least one way to do it. There are a ton of variations on this, depending on your needs, and your imagination can probably take it from here.
